Introduction about Kali Linux
Kali Linux is preinstalled with over 300 penetration-testing programs, including Armitage (a graphical cyber attack management tool), nmap (a port scanner), Wireshark (a packet analyzer), John the Ripper (a password cracker), Aircrack-ng (a software suite for penetration-testing wireless LANs), Burp suite and OWASP ZAP (both web application security scanners).[2][3] Kali Linux can run natively when installed on a computer's hard disk, can be booted from a live CD or live USB, or it can run within a virtual machine. It is a supported platform of the Metasploit Project's Metasploit Framework, a tool for developing and executing security exploits.[2]
It was developed by Mati Aharoni and Devon Kearns of Offensive Security through the rewrite of BackTrack, their previous forensics Linux distribution based on Ubuntu. The third core developer Raphaël Hertzog joined them as Debian expert.[4][5]
Kali Linux is based on Debian Jessie. Most packages Kali uses are imported from the Debian repositories.[6]
Kali Linux is developed using a secure environment with only a small number of trusted people that are allowed to commit packages, with each package being signed by the developer. Kali also has a custom-built kernel that is patched for injection. This was primarily added because the development team found they needed to do a lot of wireless assessment.
- Require Installation
For i386 and amd64, minimum 512MB RAM.
Support CD-DVD Drive / USB boot
- Installation preparation
Burn ISO Kali Linux to DVD
Set for first booting the computer to a CD or Flashdisk
- Select Graphical Install.

- Select your preferred language and then the location of your country. You will also be prompted to configure your keyboard with the appropriate keymap.

- Select your geographical location.

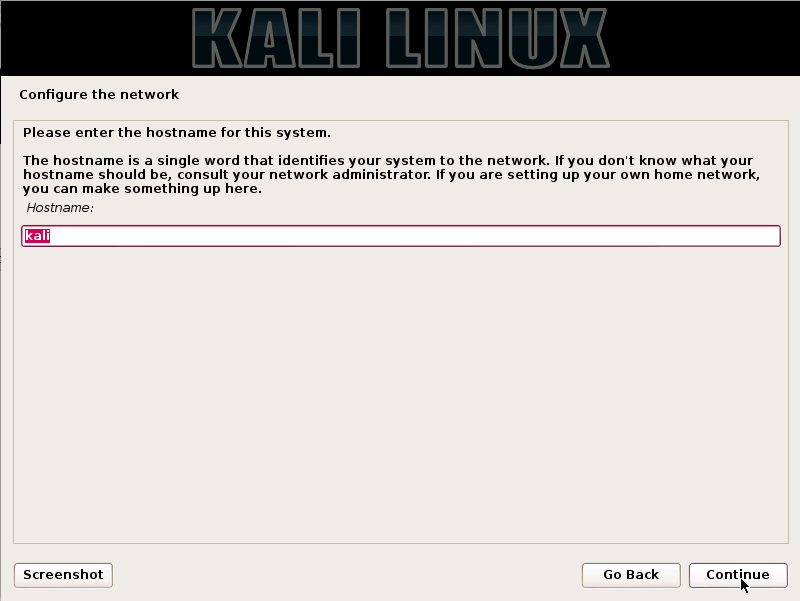
- The installer will copy the images to your hard disk, check your network interface, and then ask you to enter a hostname for your system. In the example below, we have set "kali" as the name of our host.
- You can provide a default domain name in this system to be used.

- Next, enter the full name for a non-root user for the system.

- A default user ID will be created, based on the full name that has been created. if you want, You can change it.

- Next, set your time zone.

- The installer will now check on your disk and offers four choices. In this example, we use the entire disk to our computer and do not configure LVM (logical volume manager). Experienced users can use partitioning method "Manual" for more detailed configuration options.

- Select disk to partition.

- Depending on your needs, you can choose to save all files in a single partition by default - or to have a separate partition for one or more top-level directory. If you are not sure which one you choose, select "All files in one partition".

- Next, you have the last chance to review your disk configuration before the installer to make changes that can not be returned. After you click Continue, the installer will continue its process and you're nearly finished the installation process.

- Configuring a network mirror. Time using a centralized repository for distributed applications. You need to enter appropriate proxy information required.

- Next, install GRUB.

- Finally, click Continue to reboot into the new installation Trump.

- after Installation
Now that you've finished installing Kali Linux, it's time to customize your system. You can also find tips on how to maximize the Kali Linux Forums Kali Linux Users.
0 Response to "Tutorial Install Kali Linux On PC"
Post a Comment